Resources
More clarity and control in your back office: new updates in Aqqo
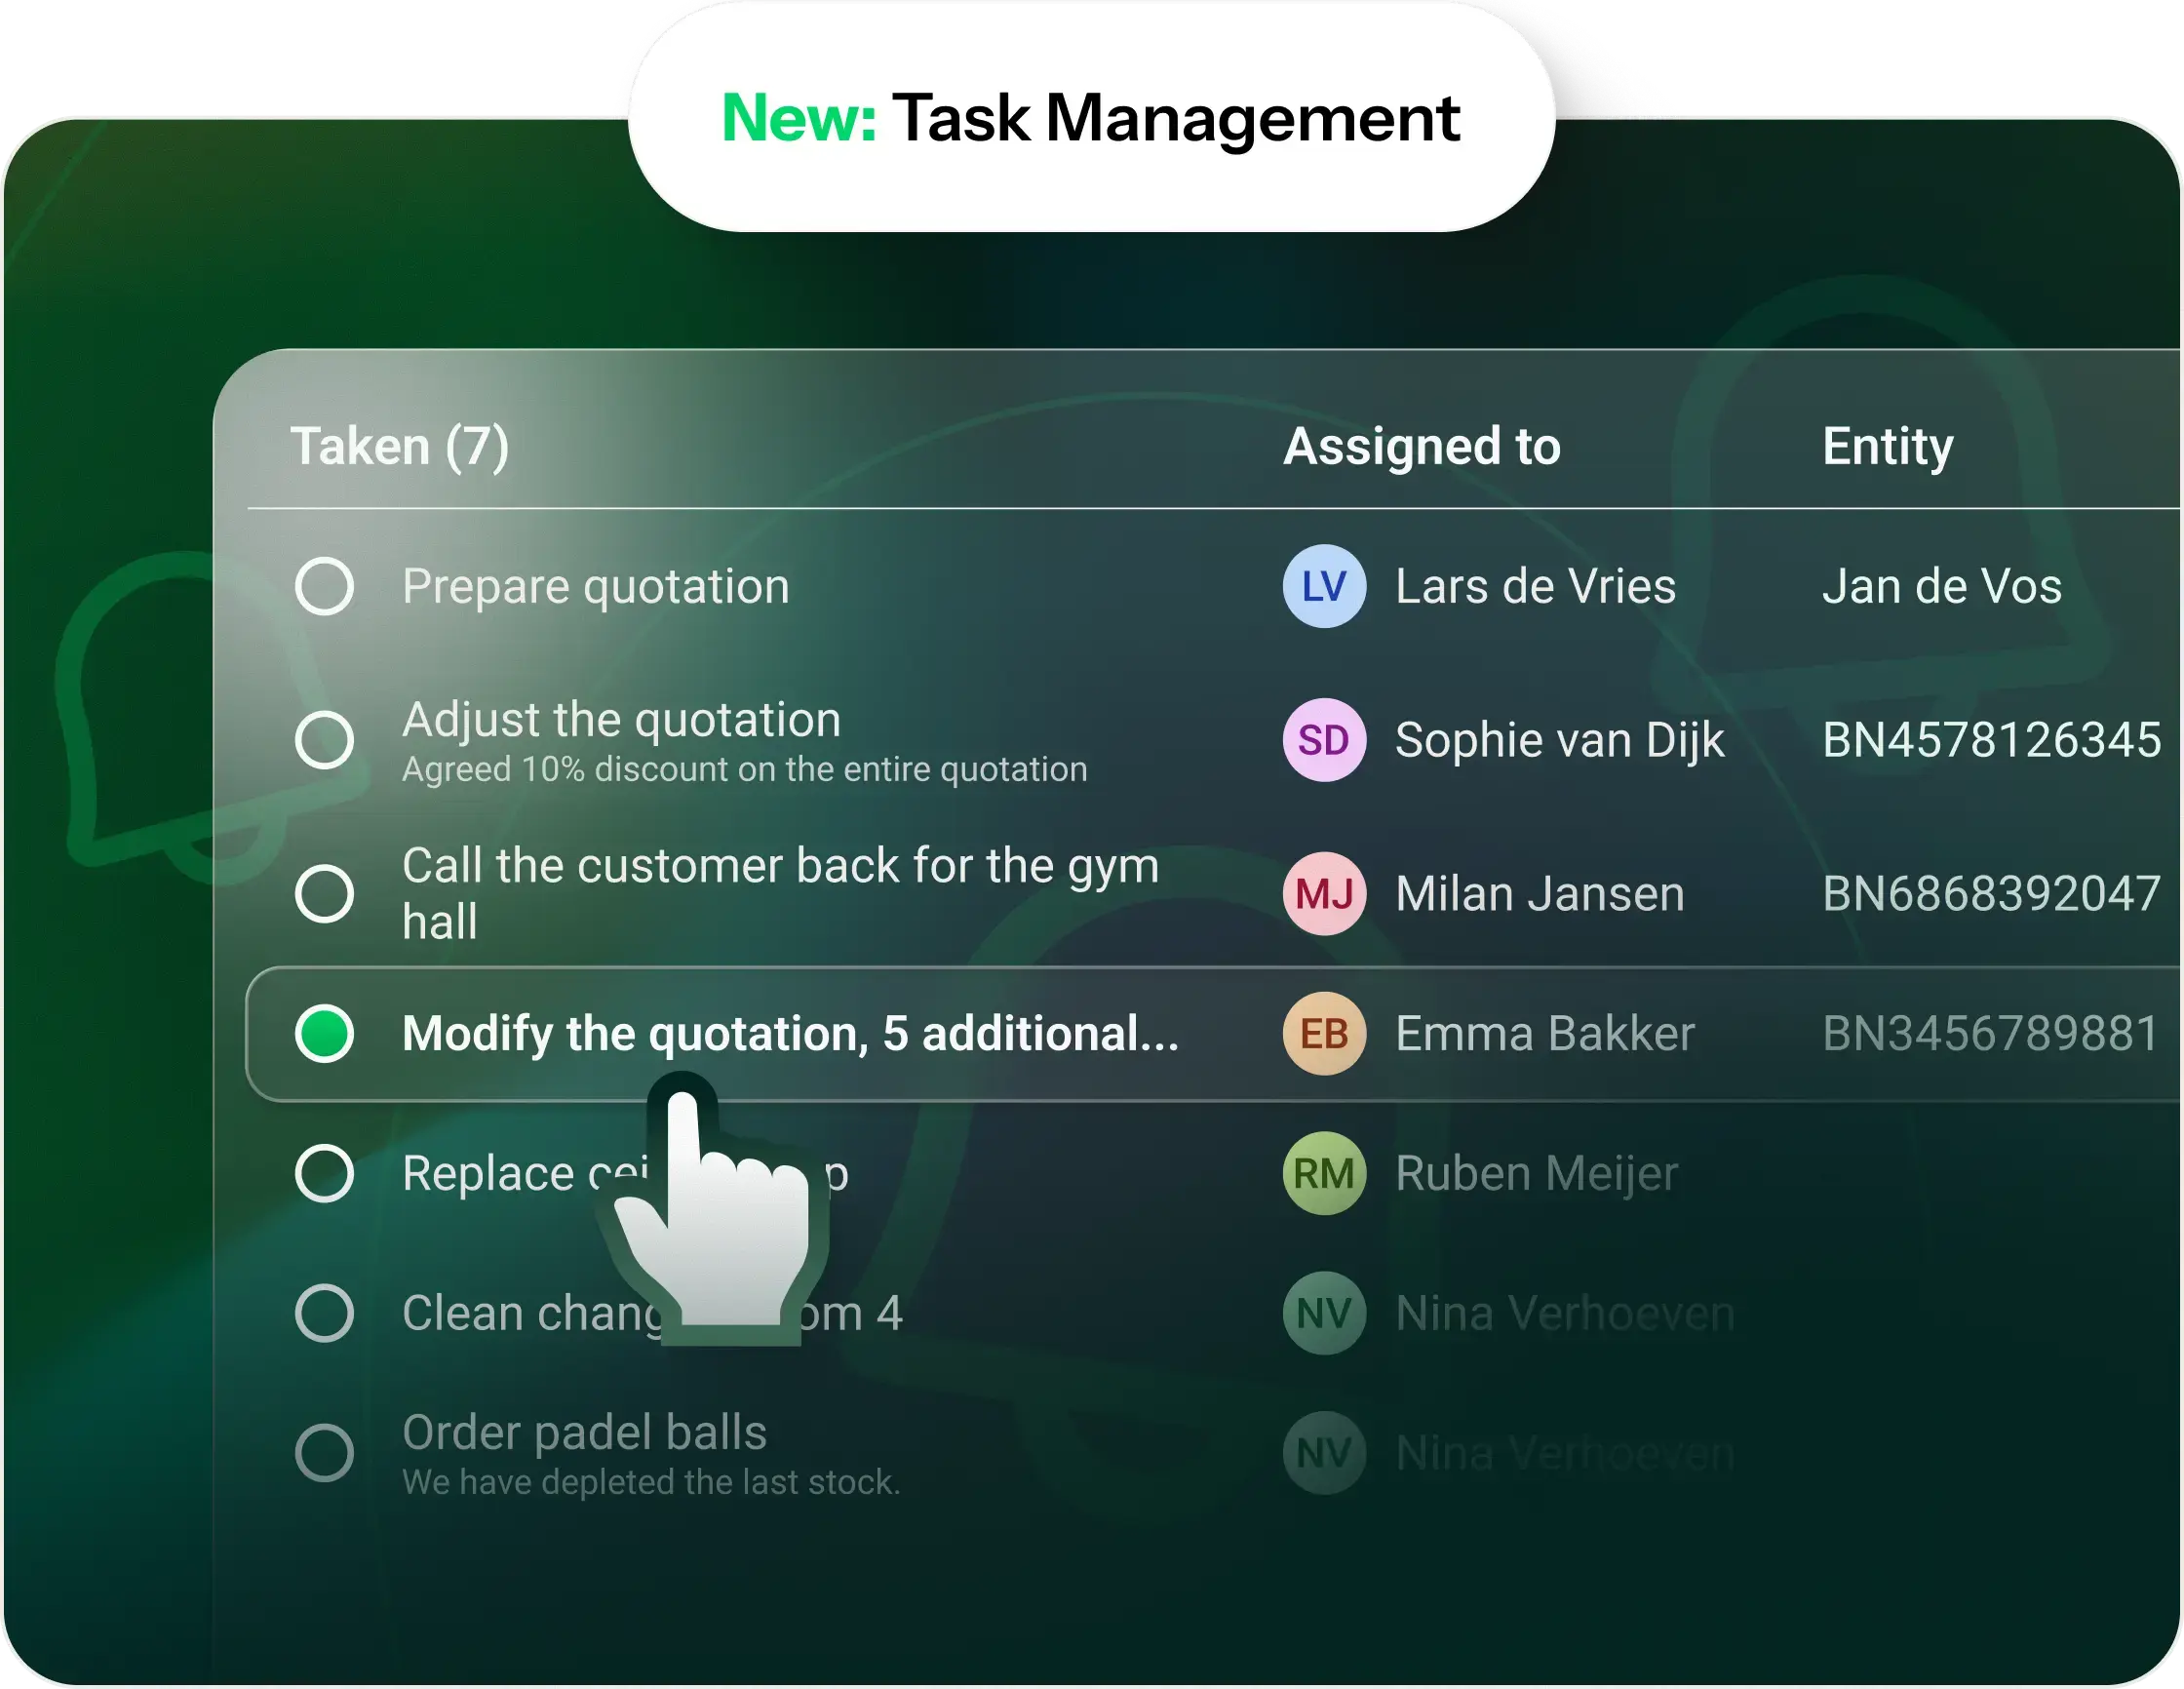
This January, we’re introducing two improvements that make working in Aqqo even clearer and more reliable. With the new Task Management, you gain better control over actions and follow-ups within your team. At the same time, automatic document storage for bookings ensures full transparency around sent quotations and booking confirmations.
Together, these updates support one key goal: more peace of mind, clarity, and control in your back office.
New: Task Management in Aqqo
With the new Task Management feature, you can easily structure all actions related to customers and bookings. Tasks help you distribute work, safeguard follow-up, and ensure nothing is overlooked — even during busy periods.
What can you do with Task Management?
- Create tasks for yourself or another back-office user
- Link tasks to a customer or booking
- Clearly view open and completed tasks
- Edit, complete, or delete tasks
- Always see who needs to do what — and by when
Completed tasks are automatically archived, so your focus stays on what still needs attention.
Where can you find Tasks?
Tasks are available in three places:
1. Task overview
Via the bell icon in the top right corner, go to ‘Tasks’. Here you can see all open and completed tasks at a glance — for yourself and for others.
2. At customer level
On a customer’s page, you can immediately see which tasks are open or completed. From here, you can easily add a new task for that customer.
3. At booking level
Tasks are also visible at booking level, giving you direct insight into what still needs to be done for a specific reservation.
Quickly add a task
Using ‘Add new task’, you can create a task in just a few seconds, including a clear deadline. This keeps follow-up concrete and manageable.
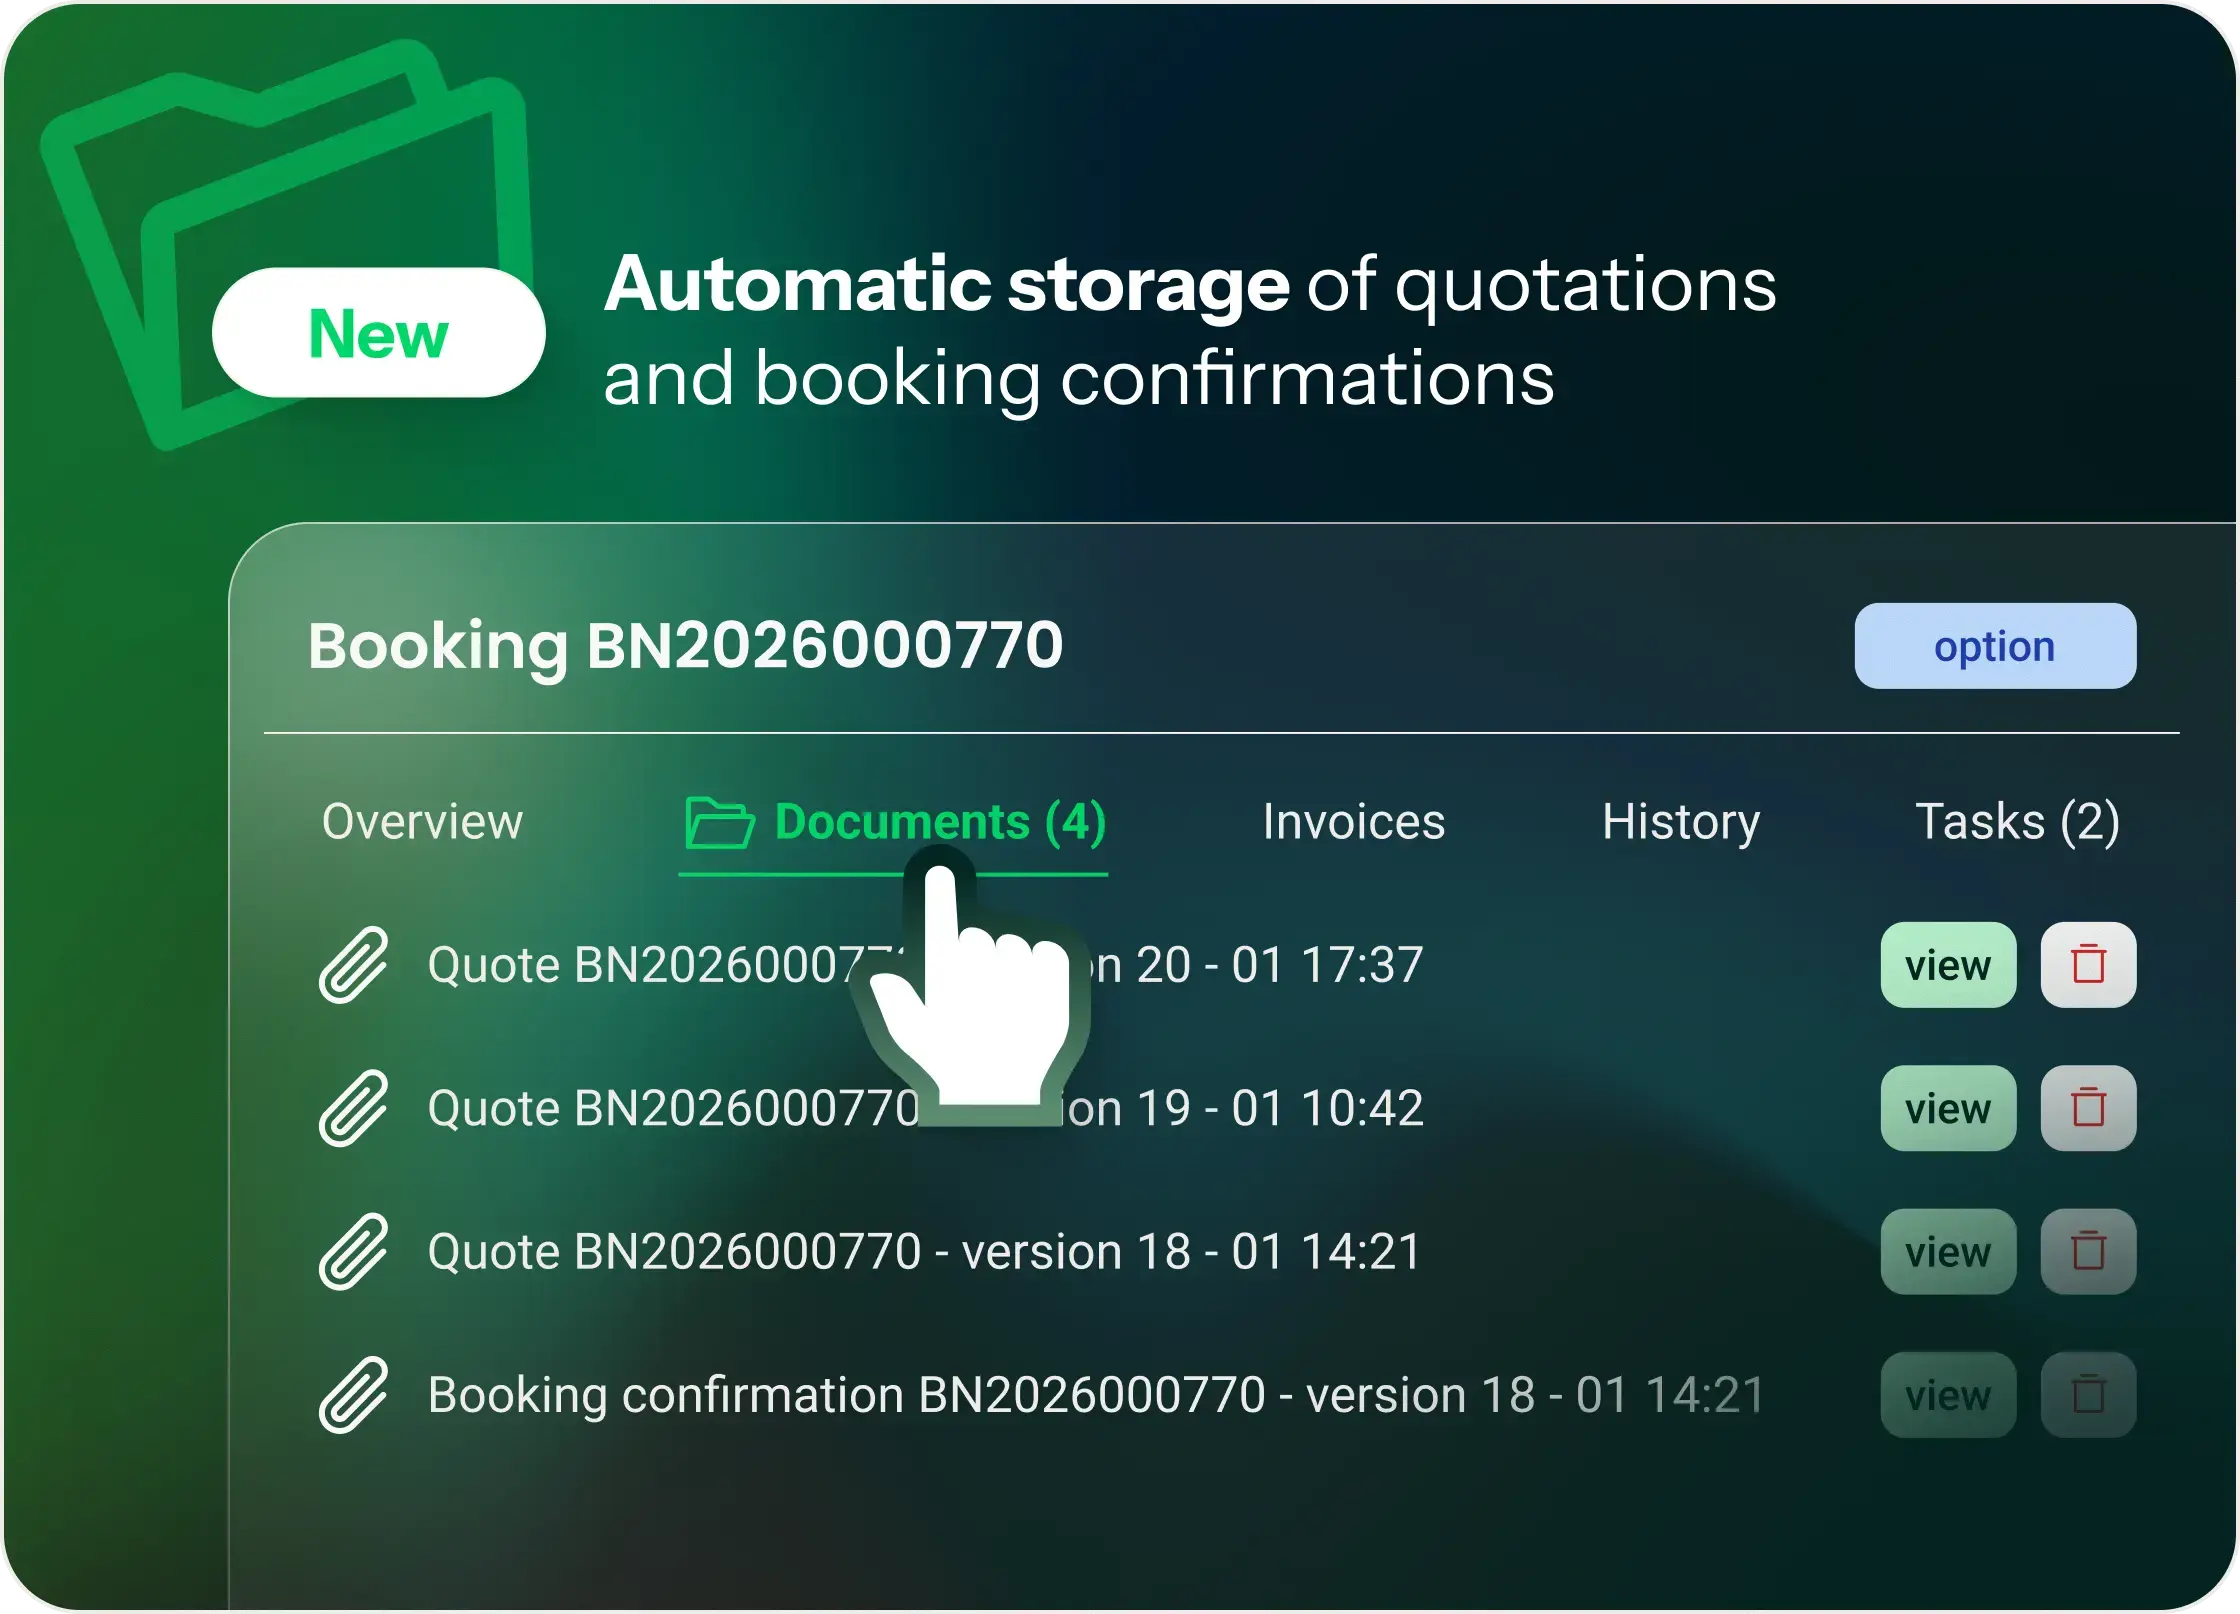
New: automatic storage of quotations and booking confirmations
Since 25 November 2025, Aqqo automatically saves a copy of every sent quotation and booking confirmation. These documents can be found directly in the Documents tab of the relevant booking.
This gives you complete insight into what has been sent — including order, versions, and exact content.
Where can you find the documents?
- Open the booking
- Go to the Documents tab
- Here you’ll find all sent quotations and confirmations, sorted by date and time (most recent at the top)
Good to know
- Automatic storage applies from 25 November 2025 onwards
- Documents sent before this date are not stored retroactively
Do you send quotations manually?
If you download a quotation and send it outside of Aqqo, mark it via:
Send → Mark quotation as manually sent
Aqqo will then automatically ensure:
- correct send logging in the History tab
- storage of the quotation PDF in the Documents tab
Key benefits at a glance
- Complete history
- You can see exactly which quotations and confirmations were sent — including all versions and changes.
- Better control when changes are made
- All versions remain available, with no risk of documents being overwritten.
- Reliable proof
- Useful in case of questions or discussions afterwards: all sent versions are demonstrably available within the booking.
More overview, less noise
With Task Management and automatic document storage, we’re taking another step toward a back office that supports your work instead of distracting from it. Fewer loose to-do lists, less searching, and more control — for you and your team.
Contact us
Do you have any questions about this feature or Aqqo in general? Feel free to contact us through our Contact form.

New in Aqqo: One Central Search Bar!
Find customers, bookings, and invoices in seconds.
Starting Monday, November 24, the new smart search bar will be available. With this feature, you can search your entire Aqqo environment in real time. Need to quickly look up a customer, open a booking, or check an invoice? You’ll find it in just a few seconds. Fewer clicks, fewer tabs, and much faster access to the information that matters.
What’s new from November 24?
With the new search function, you can instantly browse through the key areas of your Aqqo environment:
- Customers – Find the right organization or contact in seconds.
- Bookings & events – Jump straight to the right reservation with one click.
- Invoices – Review payments or outstanding balances instantly.
- Knowledge Base articles – Get immediate answers to frequently asked questions.
Try the new search feature starting November 24 Whether you’re working in Planning, CRM, or Invoicing, the search bar will always be available at the top left of your Aqqo dashboard.
The Technology Behind It
The new search bar runs on Elastic technology, allowing Aqqo to index and search large data volumes in milliseconds. You’ll instantly see relevant results, even in environments with thousands of customers, bookings, and invoices. For you as a user, it feels fast, simple, and intuitive, powered by a robust search engine working behind the scenes.
Peppol e-Invoicing Integration via eConnect
From January 1, 2026, Peppol e-invoicing becomes mandatory in Belgium for all B2B transactions. In the Netherlands, Peppol e-invoicing is also rapidly becoming the new standard. By connecting Aqqo to Peppol now, you’ll be ready for the future, and benefit from a faster, safer, and fully compliant invoicing process.
What is Peppol?
Peppol (Pan-European Public Procurement Online) is the international standard for the secure exchange of e-documents, such as e-invoices.
Peppol is the future of invoicing, offering benefits like:
- Fully compliant in Belgium and the Netherlands
- Faster payments
- Fewer manual errors
- Secure, standardized, and future-proof format
What does this mean for your organization?
In Belgium: e-invoicing via Peppol is mandatory from January 1, 2026.
In the Netherlands: e-invoicing via Peppol is recommended and already mandatory for government invoices.
What is eConnect?
To use Peppol, your organization connects through a certified service provider. Aqqo partners with eConnect, our trusted Peppol provider. eConnect registers your organization on the Peppol network, so you can send e-invoices directly from Aqqo, no extra steps needed.
Note: You’ll need an eConnect account to activate Peppol in Aqqo. Once set up, you can enable the connection within your Aqqo environment.
Pricing
Aqqo – eConnect Integration
Starting January 1, 2026, a monthly fee applies: €10 per organization per month
eConnect Pricing
The exact eConnect subscription costs are available via the eConnect registration portal.
Contact us
Do you have any questions about this feature or Aqqo in general? Feel free to contact us through our Contact form.
This Product Update highlights what's new in Aqqo. The updated Products Page combines products, day programs and discounts in one clear screen for fewer clicks and more control. Read more below or start using it in Aqqo today.
New: One Central Products Page
Aqqo introduces a redesigned Products Page within a booking, allowing you to manage products, day programs, and discounts from one clear, central screen.
This means: fewer clicks, better overview, and faster workflows.
- Products (New: Add manual products)
- Day Programs
- Discounts (New)
Open any non-invoiced booking and click on Products to access the new page.
New: Add Manual Products
In addition to catalog products, you can now easily add custom items or temporary offers. Everything is displayed correctly on quotes and invoices, including VAT handling. No more need for ‘dummy products’.
How it works:
- Click Add Product → Manual Product
- Fill in the fields → Save
Link Products to Program Items
Within day programs, you can now link products directly to a specific program line, such as a lunch, workshop or session.
This makes it easy to see which product belongs to which part of the event, providing more structure and clarity in complex bookings.
New: Apply Discounts Without Workarounds
Discounts no longer need to be added using ‘dummy products’.
Now you can apply discounts directly within the booking:
- On the total amount or per product
- As a fixed amount or percentage
- Automatically recalculated when changes are made
Faster, more accurate and instantly reflected on quotes and invoices.
Contact us
Do you have any questions about this feature or Aqqo in general? Feel free to contact us through our Contact form.
Accidentally cancelled a booking? No worries.
In Aqqo you can easily restore it via 'Change status'. You won’t have to re-enter anything, and all linked details (like products and day programmes) are kept intact as long as they’re still available.
With the new 'Change status' option you can:
- Reactivate a booking
- Lose no data
- Save time
Note: Paid bookings can’t be restored for administrative reasons. Products must still exist in your environment.
Booking status overview
In the 'All bookings' view you now have quick filters so you don’t have to set up every filter manually. With one click you get exactly the overview you need.
Available quick filters
- Upcoming bookings
Shows all future bookings. - Recent bookings
Shows the most recently created bookings. - Pending requests
Bookings created by users that aren’t confirmed yet. - Pending options
Bookings created by admins that are still on option. - Custom filter
Create your own filter (for example by date, status or location).
This feature is especially useful for commercial or event users who need a clear view of outstanding options at a glance.
Contact us
Do you have any questions about this feature or Aqqo in general? Feel free to contact us through our Contact form.
In the past few weeks our team has rolled out a major upgrade to the print run sheet for bookings – and it’s now officially live. The new run sheet clearly shows products by programme line so you see at a glance which item is scheduled when. We’ve also added a dedicated section for products that apply to the entire booking, regardless of specific times.
Benefit
This new run sheet gives you an instant overview of the day’s flow. That makes preparation, planning, and on-site execution much more efficient.
What’s new in the run sheet?
A key part of this update is letting admins choose whether to include financial information on the run sheet. If you opt in, the sheet will show all booking-related amounts; if not, it won’t.
Key updates:
- New layout based on user feedback
- Dynamic fields depending on configurations and sub-bookings
- Free fields are displayed
- Booker’s email and phone number added
- Internal and external memos visible on the run sheet
- Room setup and participant count included
- Support for products and programmes
- Products can appear outside the day programme
- Programme lines show products with quantity, description, unit price, and total amount
- Financial info
- Total booking amounts shown both excluding and including VAT
- New fields “Booked by” and “Payment method” added
Expanded print options
You can now generate the run sheet from multiple places in Aqqo, with flexible display settings.
From a booking:
- Open the booking via the All bookings or Recent bookings page
- Click Print booking
- Choose whether to include financial info
- Your run sheet is generated
From the dashboard:
- Go to your dashboard
- Select a specific day or week
- Click the print icon
- Choose one of:
- Print day schedule
- Print week schedule
- Print month schedule
- Run sheet per booking (day)
- Run sheet per booking (week)
- Print overview
- Your run sheet is generated
These options make it easier to prepare your day or event week with the run sheet as your central overview.
Attach documents to users
You can now link documents directly to user profiles.
What you can do:
- Add contracts, terms, or other files to a user
- Keep documents stored with the user for use in future bookings
- Set this up right from the user’s page
Enjoy these new features in Aqqo and let us know how they help streamline your workflow!
Contact us
Do you have any questions about this feature or Aqqo in general? Feel free to contact us through our Contact form.
Take control with modules in Aqqo
We’ve introduced a new Modules feature that gives admins more control over which functions they use. On a clear overview page you see at a glance which modules are available in your environment, and if you have the right permissions you can enable or disable modules yourself.
What are Modules?
Modules are extendable components in Aqqo that contain specific functionality. Think extra settings like discount codes or custom fields for users or bookings.
Where to find Modules?
- Go in the menu to Admin > Settings.
- On this page you’ll see the modules you can manage.
- By default we show these modules:
- Customer management
Add custom fields to your user sign-up form. You choose:- the input type (such as dropdown menu or text field),
- who can see or fill in the field,
- whether the field is required.
Example: a “Salutation” field with a dropdown menu (Mr/Ms/Mx).
- Booking management
Add custom fields to your booking form. You set:- the input type,
- who can see or fill in the field,
- whether the field is required.
Example: a “Dietary preferences” field with an open text box, optional.
- Click Discover more modules to explore extra features, like discount codes, and activate any you want.
Who can manage what?
- Every admin has view rights and so sees which modules are available.
- Only admins with edit rights can activate or adjust modules.
Contact us
Do you have any questions about this feature or Aqqo in general? Feel free to contact us through our Contact form.
Good news! Within Aqqo, it is now possible to modify products and daily programs for an entire series of bookings with just one click. Administrators can easily and efficiently make adjustments without having to edit each booking individually.
Copying Products for a Series of Bookings
- In the menu, go to Bookings > All Bookings or Bookings > Recent Bookings. On this page, you will see an overview of all created or recent bookings.
- On this page, you will see an overview of all created or recent bookings.
- Select the series of bookings you want to modify by clicking the icon.
- A new page will open with all details about the selected booking series.
- Scroll down to see all individual bookings within the series.
- Click Products on the first booking in the series from which you want to apply the change.
- In the new window, make the desired changes and choose whether to:
- Modify only the products for this specific booking.
- Or modify all products for future repetitions of "Rental Object X" on [day] from [time] to [time].
- Click Save at the bottom right of the window to apply the changes.
After completing these steps, the products have been successfully updated for the entire booking series. Note: All existing products for a modified series will be removed after saving.
Copying Daily Schedules for a Series of Bookings
Do you use daily schedules? You now also have the option to copy a daily schedule to future repetitions within a series.
- In the menu, go to Bookings > All Bookings or Bookings > Recent Bookings.
- On this page, you will see an overview of all created or recent bookings.
- Select the series of bookings you want to modify by clicking the icon.
- A new page will open with all details about the selected booking series.
- Scroll down to see all individual bookings within the series.
- Click Schedule on the first booking in the series from which you want to apply the change.
- In the new window, make the desired changes and choose whether to:
- Modify only the daily schedule for this specific booking.
- Or modify all daily schedules for future repetitions of "Rental Object X" on [day] from [time] to [time].
- Click Save at the bottom right of the window to apply the changes.
After completing these steps, the daily schedules have been successfully updated for the entire booking series. Note: All existing daily schedules for a modified series will be removed after saving.
Contact us
Do you have any questions about this feature or Aqqo in general? Feel free to contact us through our Contact form.
Offering discount codes for rooms is a smart way to attract more customers. Whether your goal is to bring in new clients, reward existing ones, or launch a temporary promotion, our new discount code module makes it easy. Additionally, you gain full insight into all created discount codes.
How to set up a discount code for a room
You can easily create a new discount code via the Bookings > Discount Codes page. Follow these steps:
- Unique discount code name: Assign a unique name to your discount code (note: each name must be unique).
- Discount percentage: Set the discount percentage.
- Limit: Define how many times the code can be used.
- Applicable rooms: Select which rooms the discount code applies to.
- Validity period: Set a start and end date for the discount.
Note: Duplicate discount code names are not allowed. Make sure each code has a unique name.
Discount code overview
The discount code overview provides you with immediate insight into:
- Expiration date: See when a discount code will expire.
- Usage: Check how often the code has been used.
Click on a discount code for more details, such as linked bookings, validity periods, and associated rooms.
Quickly and easily archive discount codes
Is a discount code no longer relevant? Select the code(s) and archive them using the handy Bulk Edit button. This keeps your discount code management clear and up to date.
How does a discount code work on the rental portal?
Renters can easily apply a discount code during the payment process:
- Immediate validity check: Renters will instantly see if a discount code is valid.
- One-time application: Discount codes are applied once. For recurring bookings, the discount will be applied within the set validity period.
- Automatic limit control: If the usage limit of a discount code is reached, it can no longer be applied.
Contact us
Do you have any questions about this feature or Aqqo in general? Feel free to contact us through our Contact form.
At Aqqo, we’re committed to creating a consistent, accessible, and user-friendly experience across all our products. That’s why we’ve been working behind the scenes to modernize the design of the Aqqo back office. One of the most noticeable updates? A shift in button colors—from blue to green.
What has changed?
- Primary buttons are now green instead of blue.
- Secondary buttons are white, offering a more subtle visual support.
- Better accessibility – The new green buttons provide stronger contrast, making it easier for users, including those with visual impairments, to navigate Aqqo effortlessly.
This change aligns with WCAG (Web Content Accessibility Guidelines), ensuring that our platform remains inclusive and easy to use for everyone.
What does this mean for you?
- Clearer navigation – Green buttons stand out where they matter most, guiding you seamlessly through daily tasks.
- A modern, refreshed look – The updated design creates a calmer, cleaner, and more visually appealing interface.
- An improved user experience – Every update we make is aimed at enhancing efficiency and usability.
Continuous improvements for a better experience
At Aqqo, we’re always evolving to offer you the best possible platform. These design updates are just one of many steps toward making Aqqo more intuitive, secure, and enjoyable to use.
Contact us
Do you have any questions about this feature or Aqqo in general? Feel free to contact us through our Contact form.
Aqqo has an integration with the access control system SaltoKS. SaltoKS offers the ability to remotely manage doors and provides automatic access to tenants. This feature is not only an absolute must-have for all (sport) accommodations, but it’s also something tenants won’t want to miss. Thanks to the integration with SaltoKS, there’s no longer any need to worry about physical access tools, such as keys or tags. As a result, everyone can enjoy the convenience of an easy-to-use system for accessing their booked locations. This isn’t just a major advantage for tenants, but also for administrators renting out their accommodations through Aqqo!
What is SaltoKS?
SaltoKS is a cloud-based access control solution. It manages and controls all locks located at the physical location of a customer, enabling bidirectional data exchange between Aqqo and SaltoKS. After a user successfully creates a booking, they receive a uniquely generated access code to use during the time period of their booking. But that’s not the only way users or administrators can access the location; access is also possible through hardware tokens like droplets, the SaltoKS app, or the Aqqo app.
Key features for tenants
Tenants can enter their booked location using their unique access code, but Aqqo offers even more options. With the SaltoKS app, it’s possible to set the door to walk-in mode during an active booking. This means the door to the booked location will remain open for anyone as long as the booking is active. This is especially convenient for teammates or visitors!
Take your renting process to the next level
Aqqo is the ultimate solution for streamlining your reservation and rental processes. The integration with SaltoKS is just one of many features that make our system a powerful tool. From connections that provide real-time membership insights to accounting software that eliminates manual invoicing, Aqqo is designed to support growth.
Contact us
Do you have any questions about this feature or Aqqo in general? Feel free to contact us through our Contact form.
Over the past few weeks, our team has worked hard on improving the reservation request process, and we’re excited to announce that everything is now live! The process has been given a fresh look and feel, and step three of the process has seen significant enhancements. Below, we’ll walk you through the changes made to the online booking engine has been updated—read on!
The reservation request process
We’ve made improvements to the Room Preferences step of the reservation process. Here’s an overview of the changes:
- Participants: When the number of participants is active, this field must now be filled in.
- Room Setup: After entering the number of participants, you can select the desired room setup from a list.
- Products: Products are now visually displayed differently, and it’s possible to upload an image for each product. You can do this by navigating to Management > Products and clicking the image icon next to the product.
- Products Based on Participants: For products where the ‘quantity’ field is configured as ‘based on the number of participants,’ the correct amount is now automatically filled in. Using the checkbox at the start of the row, the customer can add the product to the reservation.
Adding product photos
As mentioned earlier, products are now displayed visually. Administrators can quickly and easily set this up within the admin environment. Adding product photos helps renters get a better understanding of which products they’re booking with an order. Follow these steps to set up photos for products:
- Navigate to Management > Products in the menu.
- Click on the search icon next to the product you want to add a photo to.
- A new window will open where you can upload a product photo of your choice. Once you’ve selected the correct photo, click Upload.
- The product photo will be successfully added to the system and can be viewed during the reservation steps.
Contact us
Do you have any questions about this feature or Aqqo in general? Feel free to contact us through our Contact form.
Narrowcasting is a handy solution for businesses of all kinds. Administrators can display live, up-to-date information to their users, ensuring everyone stays informed about the latest changes. Users can view the current schedule in real-time, significantly improving communication efficiency. This provides clear benefits for both administrators and users.
New feature: disable narrowcasting for specific bookings
There are times when certain bookings in the system don’t need to be displayed via narrowcasting. Starting today, you can easily disable narrowcasting for specific bookings. Our team has worked hard to develop this new feature, allowing administrators to decide per booking whether it should be visible via narrowcasting.
How it works
This feature is simple to manage with a checkbox on the Bookings page. When the checkbox is unchecked, that booking will not be displayed on narrowcasting.
Contact us
Do you have any questions about this feature or Aqqo in general? Feel free to contact us through our Contact form.
For some time now, it has been possible to add an internal memo to bookings and users within the system. This feature provides clarity and ensures that administrators are always informed about important notes related to a booking. Good news: this handy feature has been expanded! From today, the internal user memo will be displayed during the reservation process. When you create a booking for a user who has an internal memo, it will appear in step 4 of the booking process.
What is a user note?
A user note is an internal memo for users, where administrators can share information about the respective user among themselves. This could be something like "this user has outstanding payments." All these details can now be easily recorded in the user note. It provides administrators with an additional way to maintain oversight and ensures that administrators are always up to date on any changes related to users.
How to set up a user note
Setting up a user note is quick and easy for any administrator:
- Go to the menu and select Users > All Users.
- Select the user for whom you want to add a note.
- A new page will open, displaying all the details related to the selected user.
- On this page, you’ll see a text field on the right where you can enter the user note.
- Once you’ve finished entering the memo, click Save Internal Memo.
Rate check during booking
Displaying the user note during the reservation process isn’t the only change to the booking steps. In addition to the user note, the system will now check if the rate set for the booking matches the rate linked to the user. If these rates don’t match, a notification will appear on the screen. From this notification, you can directly adjust the rates to match, if desired.
Contact us
Do you have any questions about this feature or Aqqo in general? Feel free to contact us through our Contact form.
The admin environment of Aqqo is the central hub where administrators maintain oversight and learn everything about our latest features via the knowledge base. We’ve released an update to further improve navigation (the menu), making it more user-friendly and giving it a modern look and feel.
What has changed in the admin environment?
The menu on the left side of the screen has been redesigned to be more compact and efficient. Everything you’re used to, but just a little better:
- The menu can now easily be collapsed by clicking Collapse. When collapsed, you can quickly expand it again using the expand icon (see the arcade for visual support).
- The gifts, knowledge base, and account settings have been moved from the bottom-left corner to the top-right corner. All these tools are now conveniently grouped under a single button.
Contact us
Do you have any questions about this feature or Aqqo in general? Feel free to contact us through our Contact form.
It is essential that every location is both secure and easily accessible to tenants, especially when the accommodation is unmanned. Our seamless and powerful integrations with iLOQ and SaltoKS make this possible. We already had an integration with the SaltoKS access control system, but now we have added another strong player: iLOQ. From today, you can use an iLOQ access control integration that directly manages your access hardware from Aqqo.
What is iLOQ?
Since 2007, iLOQ has been providing a smart and sustainable way to digitally secure accommodations. Digital access management offers users more freedom, security, and flexibility while allowing businesses to manage completely unmanned locations. iLOQ’s self-sufficient digital locks and NFC solutions for mobile access control have transformed the locking industry by enabling electronic locking without batteries or cables. This makes iLOQ a leading player in access control systems.
Why integrate iLOQ and SaltoKS with Aqqo?
The integrations with iLOQ and SaltoKS ensure that your accommodation is both secure and sustainable. Tenants can independently access their booked location without needing an intermediary. Once a booking is registered in Aqqo, the tenant automatically receives an access code to enter the location during the reserved hours. This not only ensures security for the administrator but also provides maximum convenience for the tenant.
Contact us
Would you like to learn more about access control, our smart integrations, or Aqqo in general? Feel free to contact us via our contact form.

Aqqo is proud to announce the acquisition of LVP, a renowned software supplier that has been offering systems for the management of sports facilities and social accommodations since 1988.
Both Aqqo and LVP provide software that supports municipalities and other location managers in efficiently managing rental administration, finances and building automation. With this strategic acquisition, they will jointly become market leaders in the field of location management software within the municipal market, with more than 100 affiliated municipalities in the Netherlands.
Experience with top 10 municipalities
Jop Hofste, co-founder of Aqqo, explains why this acquisition is so important: “LVP has a long history and built a strong reputation in large municipalities such as Amsterdam and Utrecht. With LVP's years of experience and customer network, we not only strengthen our market position, but we can also offer even more value to our existing customers.”
LVP started as Compudienst in the late 1980s and quickly grew into a pioneer in the field of accommodation management with the AMIS software package. Annet Miedema, former owner of LVP, proudly talks about the company's development: “We have always wanted to be at the forefront by constantly innovating and adapting to the needs of our customers. Merging our expertise with that of Aqqo feels like a natural next step to serve our customer base even better.
Innovation and efficiency
Aqqo, founded in 2018 by Jop Hofste and Bas Heuvelmans, has quickly proven itself as an important player with a robust and scalable SaaS solution that serves more than 1,200 locations in the Netherlands and Belgium. Bas Heuvelmans, explains: “Thanks to Jop's background in IT and my experience in accountancy, we at Aqqo have been able to combine technical and financial expertise from the start to fully automate administrative processes.”
This financial expertise has led to Aqqo Finance, a solution that automatically synchronizes financial data with accounting packages, improving accuracy and efficiency in financial processes.
Heuvelmans continues: “The synergy between Aqqo's software and our customers' financial administrations is an important driver behind our success. With now 30 colleagues, we work every day to translate our vision into reliable solutions for the more than 2,000 locations that we jointly serve since the takeover.”
Confidence in the future
Miedema sees the takeover as a positive development for both customers and employees: “After a career of almost 40 years at LVP, I have found the ideal party in Aqqo to guarantee continuity for our customers and employees. As a specialist, Aqqo knows all the ins-and-outs of accommodation reservations, making it the perfect acquisition partner for our customer base. By joining forces, the combination of Aqqo and LVP will be the absolute top in accommodation rental. I hand over the leadership with great confidence to a new, enthusiastic generation.”
Jop Hofste agrees and looks ahead: “We are extremely grateful for the trust Annet has placed in us by transferring LVP. We look forward to combining the expertise of both teams and together we continue to build the best location management product on the market. The collaboration feels natural because our cultures and core values align well. We look forward to further innovating together with the LVP team.”
Stronger together
By combining Aqqo's customer-oriented approach with LVP's decades of experience, both companies strengthen their position in the market. Both parties have proven to be successful in tenders for both small and large municipalities, which underlines the value and reliability of their joint offering.
For existing customers of LVP, this acquisition means that they can count on the trusted continuity of service, with the added value of Aqqo's expertise and innovative strength.
There is a new product update gift box available, which means a new feature in Aqqo! As of today, the "Drag & Drop" functionality is live on the dashboard and planboard pages. This feature makes moving bookings even easier, better, and faster. Moving a booking is now as simple as, as the name of the feature suggests, dragging and dropping a booking on the planboard.
It can naturally happen that a user has booked something incorrectly or wants to change the booking to a different time. With this new feature, that change in planning is completed within seconds. This allows administrators to work more efficiently, and the user can quickly book the appointment at the correct date and time.
Moving/Dragging bookings
Dragging bookings directly from the planboard is a functionality that helps every administrator work more efficiently, but it is also important to pay attention while using it. To assist you with this, we provide a smart and clear toggle at the top of the planboard, ensuring you always know when you have the option to move bookings. This way, you can prevent accidentally moving a booking without realizing it. It was important to us that this feature not only offers administrators a smart solution for moving bookings but is also safe and easy to use.
When you move a booking, you also get the option to adjust the price of the respective booking directly. This can be useful, for example, if you move the booking to the evening and an evening rate applies. Below, we explain in detail how this feature works and how to enable the "Drag & Drop" functionality within your environment.
How to use drag & drop
By following the steps below, you can move a booking using the "Drag & Drop" feature:
- At the top of the dashboard and planboard pages, you will see the Activate move mode button. When you click on this, you activate the ability to move bookings for yourself. You will subsequently see a notification in the window that informs you again that the move mode is active. Through this notification, you can also easily deactivate the move mode.
- When the move mode is active, you can move bookings by dragging them to their new day and time and/or new rental location. By dropping the booking on the desired day, time, and rental object, you move the booking to the indicated data.
After following the above steps, you have successfully moved a booking using the "Drag & Drop" functionality.
Contact us
Do you have any questions about this feature or Aqqo in general? Feel free to contact us through our Contact form.
We are always looking for ways to make our system even better and more powerful, just like this brand-new feature. From today onwards, it is possible to copy a booking, or a series of bookings, directly from the system. You no longer need to duplicate bookings manually; with a simple click of a button, you can copy the entire booking and add it to a date of your choice. You have complete control over the details of the booking, such as for which user the booking is duplicated, whether optional products should be included, and of course, the status of the new booking.
How can you copy a single booking?
Duplicating, or copying, a booking is a process that any administrator can complete without difficulty. By following the steps below, you can copy a booking:
- Navigate through the menu to Bookings > All bookings or Bookings > Recent bookings.
- On this page, you will see an overview of all/recent bookings known within the system.
- Select the booking you want to copy by clicking the search icon located on the right side of the screen.
- The booking page for the selected booking will open, showing all information about the chosen booking.
- Click the Duplicate button on this page.
- A new window will open where you need to provide various details:
- The status of the booking—choose whether the new/duplicated booking should be "Option by admin" or "Booked".
- Whether the products should be included—choose if the products from the old booking should be carried over to the new booking.
- The user for whom the booking will be made—choose the desired user here. This can be a new user or remain unchanged.
- The date of the booking—choose the date on which the copied booking should take place. When you provide a date here, the system will check if the given date is available.
- Once you have filled in all the requested information to your satisfaction, click Create booking.
After completing the above steps, you will have successfully copied a booking. Please note that when copying a booking, comments, purchase codes, day programs, and attachments are not copied.
How to copy a series or a selection of bookings from a series
There are times when you want to copy multiple bookings at once, and this is also possible. By following the steps below, you can copy a series of bookings:
- Navigate via the menu to Bookings > All bookings or Bookings > Recent bookings.
- On this page, you will see an overview of all/recent bookings known within the system.
- Select the booking you want to copy by clicking the search icon located on the right side of the screen.
- The booking page for the selected booking will open, showing all the information about the chosen booking. Here, you will also see all the bookings within the selected series.
- Select all the bookings from the series that you want to copy; this can be all the bookings or a specific selection.
- Once you have selected all the desired bookings from the series, click the Duplicate button on this page.
- A new window will open where you need to provide various details:
- Whether the bookings should be added to the current booking of the user or as new bookings.
- The status of the booking—choose whether the new/duplicated booking should be tentative or confirmed.
- Whether the products should be included—choose if the products from the old booking should be carried over to the new booking.
- The user for whom the booking will be made—choose the desired user here. This can be a new user or remain unchanged.
- The date of the booking—choose the date on which the copied booking should take place. The system will check if the given date is available. This date can be set separately for each selected booking in the series, giving you full control over all the bookings you have selected.
- When you have filled in all the requested information to your satisfaction, click Create booking.
After completing the above steps, you have successfully copied a series of bookings. Please note that when copying a booking, comments, purchase codes, day programs, and attachments are not copied.
Contact us
Do you have any questions about this feature or Aqqo in general? Feel free to contact us through our Contact form.
The Aqqo system has received another significant upgrade; the dashboard has become even more advanced. The dashboard retains its clarity but now also provides more insight into booking attributes, without needing to leave the page. From now on, it's possible to display indication icons on the dashboard. These indication icons provide insight into certain booking characteristics, and of course, you have complete control over which indication icons/attributes you find important to display for each booking. Below, we’ll tell you about the indication icons, what they mean, and how to activate this new setting within your environment. In addition to the indication icons, you can now quickly see whether a booking has been paid or not. More information on this follows later in the article.
Which indication icons are available, and what do they mean?
The icons you can activate within the system are:
- Products: When this icon is displayed within a (sub)booking on the dashboard, you immediately know that the respective (sub)booking contains one or more products.
- Activities: When this icon is displayed within a booking on the dashboard, you immediately know that the respective (sub)booking contains an activity. The specific activity is displayed using the activity’s icon.
- Comments: When this icon is displayed within a (sub)booking on the dashboard, you immediately know that the respective (sub)booking contains internal or external comments.
- Room Setup: When this icon is displayed within a (sub)booking on the dashboard, you immediately know that the respective (sub)booking contains a room setup.
You have complete control over which indication icons you want to display within your environment. You can select which icons should or should not be displayed on the dashboard for bookings and/or subbookings. How to set this up is explained below, so keep reading!
How do I activate the indication icons?
As mentioned above, you have complete control over displaying the indication icons. You can customize whether to show indication icons on the dashboard and which ones to display. Follow the steps below to set up the indication icons in your environment:
- Navigate to Management > Settings. On this page, you will see an overview of all available settings within the system.
- You'll notice a new setting added: ‘Which indication icons do you want to show on the dashboard?’ This is the setting you need to activate or deactivate the indication icons.
- In the dropdown menu for this setting, you will see various options (refer to the section above for details on these options). Select the options for which you want the indication icons to be displayed on the dashboard.
- Once you have selected the desired options, click the blue Save button at the bottom of the window to save your customized settings.
After completing the above steps, you have successfully activated or deactivated indication icons on the dashboard.
Payment status
It was always visible directly from the dashboard whether a booking was paid or not, but this feature has now received a significant upgrade. It is even clearer to determine which bookings are paid and which are not (yet) paid.
Paid bookings now have a green box next to the (sub)booking. This box indicates that the booking has already been paid. Bookings that are not yet paid do not have this box. Previously, this was indicated by a checkmark on the (sub)booking; now it is a green box. It’s also worth mentioning that if a booking is free and no payment is required, the box is automatically set to green.
Contact us
Do you have any questions about this feature or Aqqo in general? Feel free to contact us through our Contact form.